- Hauppauge Capture
- Firmware
- Connection Diagrams
- Standalone Recording
- Recording from a PS4
- Video Tutorials
- Manuals
- FAQ
Hauppauge Capture Download
Before installing Hauppauge Capture
Make sure on the side of the HD PVR Pro 60 the REC MODE switch is in the PC position and the iOS REC switch is in the ON position.
Special Hauppauge Capture version for the HD PVR Pro 60
Note: This version is exclusively for the HD PVR Pro 60. It has both video only live preview and a special mode with video and audio preview (called 'PVR' mode). To switch modes, go to Advanced and click on Video Preview. The default is PVR mode (live audio and video). For no delay live video without audio preview, click Live Mode.
Hauppauge Capture version 40118
Date: April 29, 2022 | Size: 81 MB
Release notes |
Backup download site |
Previous version 38344
New feature:
For the HD PVR Pro 60, we have added a new 'live preview audio' mode. With this mode (currently the default), we add a small video delay and then play the live video and audio through the Hauppauge Capture Preview window. You can turn off this mode and go back to no-delay video preview only: click the 'Advanced' button, go to 'Video Preview' and select 'Live'.
HD PVR Pro 60 Installation notes:
- Plug in the HD PVR Pro 60 to a USB 2.0 or 3.0 port (USB 3.0 port is recommended due to the higher power output it provides)
- Make sure on the side of the HD PVR Pro 60 the REC MODE switch is in the PC position and the iOS REC switch is in the ON position.
- Note: we recommend making all HD PVR Pro 60 HDMI and A/V connections while the device is disconnected from the USB port (in other words: unpowered).
HD PVR Pro 60 color and brightness controls
In Advanced -> Video Proc Amp, there are now settings for Brightness, Contrast, Saturation, Hue.
If you own an Xbox one, you can use the built-in Xbox One calibration tool to adjust the HD PVR Pro 60 settings. To do this:
- open Hauppauge Capture
- on your Xbox One, navigate to Display & sound -> Video output -> Calibrate HDTV
- skip to the Brightness screen. The key instruction is 'Brightness: turn this all the way up, then turn it down so that the large closed eye to the right just disappears'
- then, in Hauppauge Capture, go to the Advanced menu and open Video Proc Amp settings
- use Brightness to satisfy "turn this all the way up, then turn it down so that the large closed eye to the right just disappears".
- you can then skip on your Xbox One to the Contrast adjustment, this time using the Hauppauge Capture Contrast setting to satisfy the Xbox One instruction: "adjust the contrast to your perference, so that you barely see the large sun image to the right".
- once you have these settings, click OK and they will be saved on your HD PVR Pro 60
HD PVR Pro 60 Firmware Update
Firmware updates can be done to add new features and performance improvements to the HD PVR Pro 60
HD PVR Pro 60 Firmware Version 2.13.20191223
Note: you can verify the firmware version in Hauppauge Capture: click Advanced -> Firmware
New in this version: fixes snapshot in standalone mode and adds check on the write protect on the SD card
To install the latest HD PVR Pro 60 firmware:
- Download the firmware:
HU677UVC.BRN - Copy HU677UVC.BRN to root of your SD Card (FAT32 or exFAT is supported)
- Disconnect the USB Cable from the HD PVR Pro 60. This can be done with the HD PVR Pro 60 connected to a PC or connected stand alone.
- While unpowered, plug the SD card with the firmware file into HD PVR Pro 60's SSD slot.
- Push and hold the snapshot button (on the front of the HD PVR Pro 60).
- While pushing in the snapshot button, connect the USB cable.
- The white LEDs will flash for about a minute. You can release the snapshot button while the white lights are flashing.
- Once firmware upgrade is complete, the LED's will stop flashing.
You can verify the firmware version in Hauppauge Capture -> Advanced -> Firmware
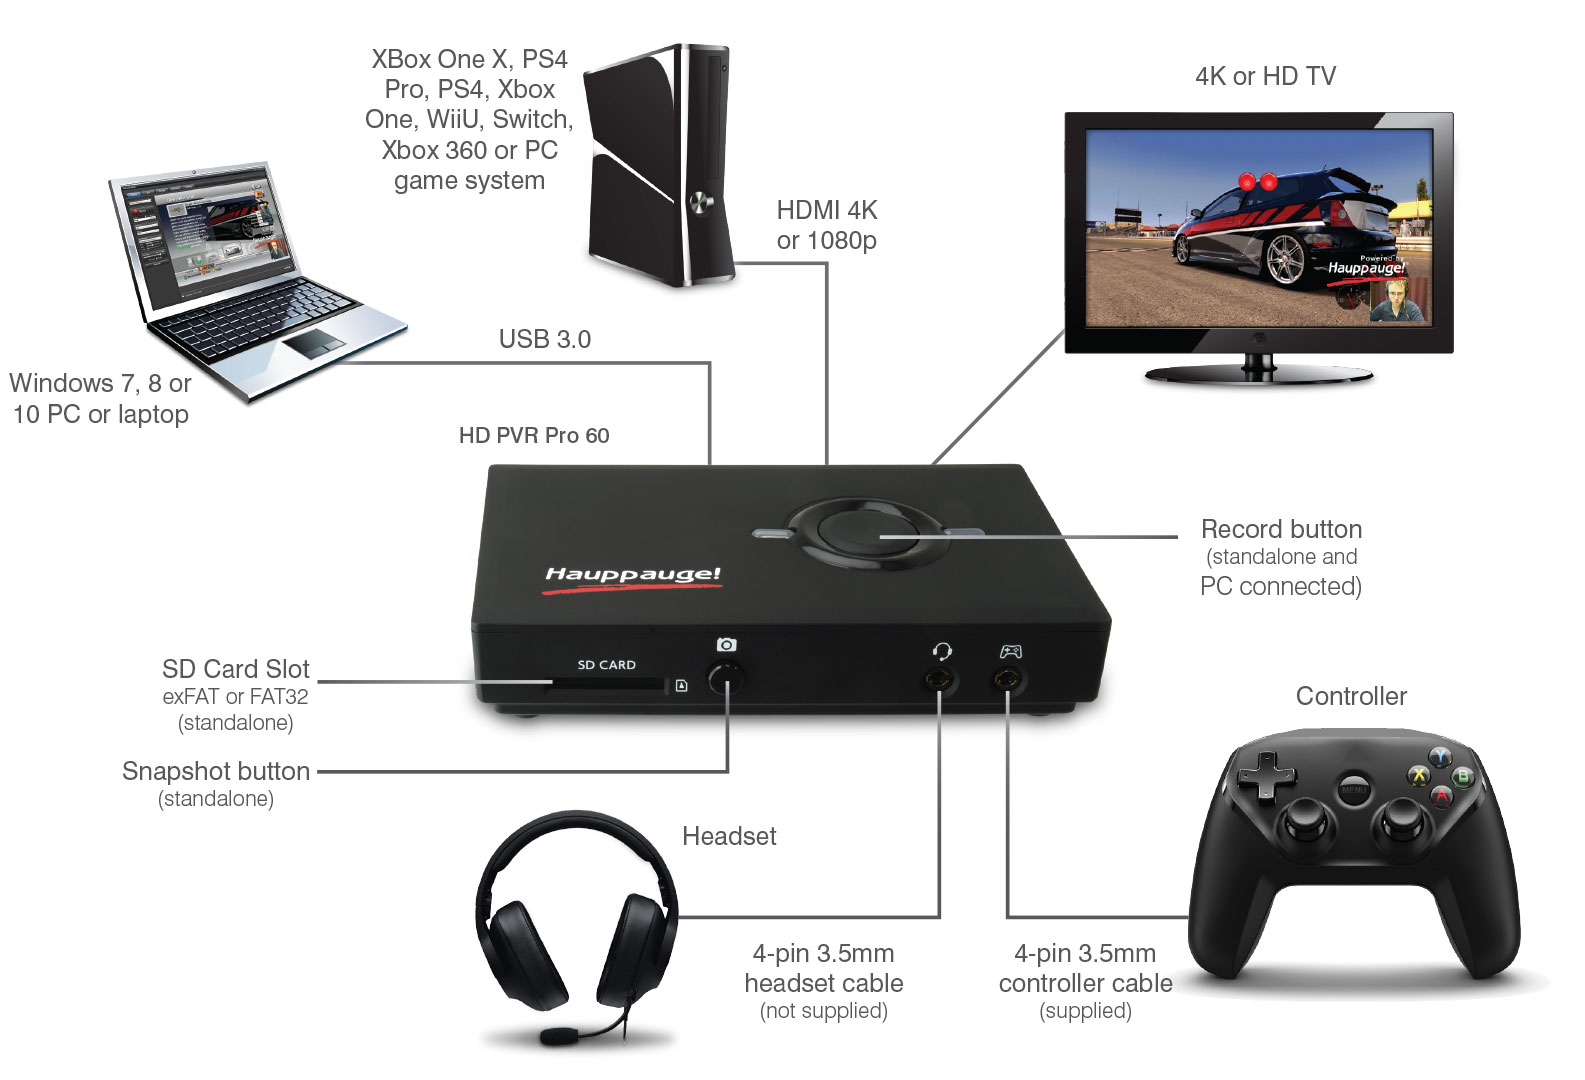
HD PVR Pro 60 Connection Diagrams
HD PVR Pro 60 Connection Diagram
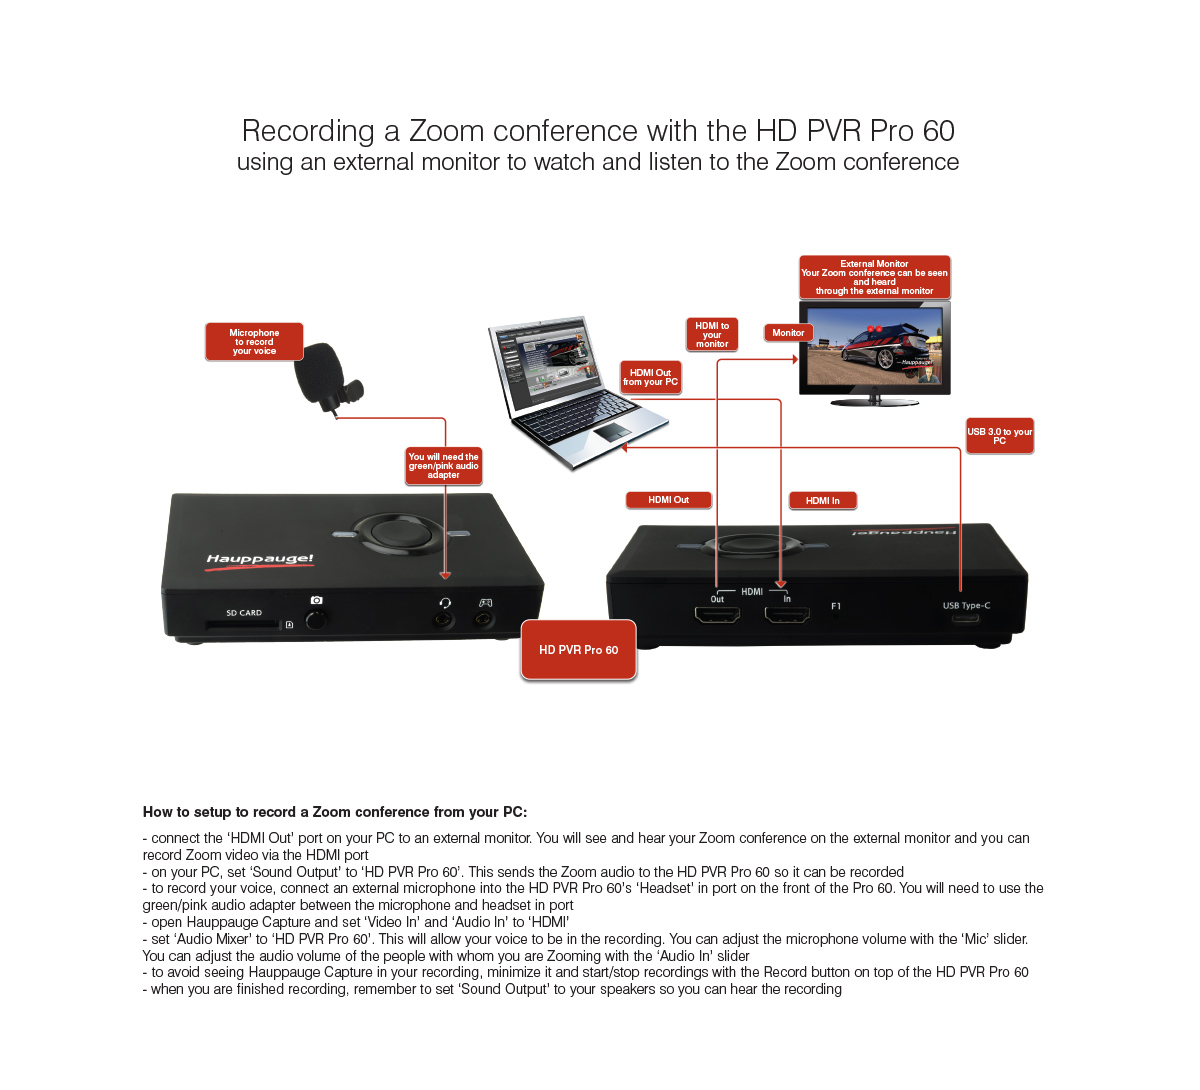
Recording a Zoom conference with the HD PVR Pro 60
PS4 to HD PVR Pro 60 Connection Diagram
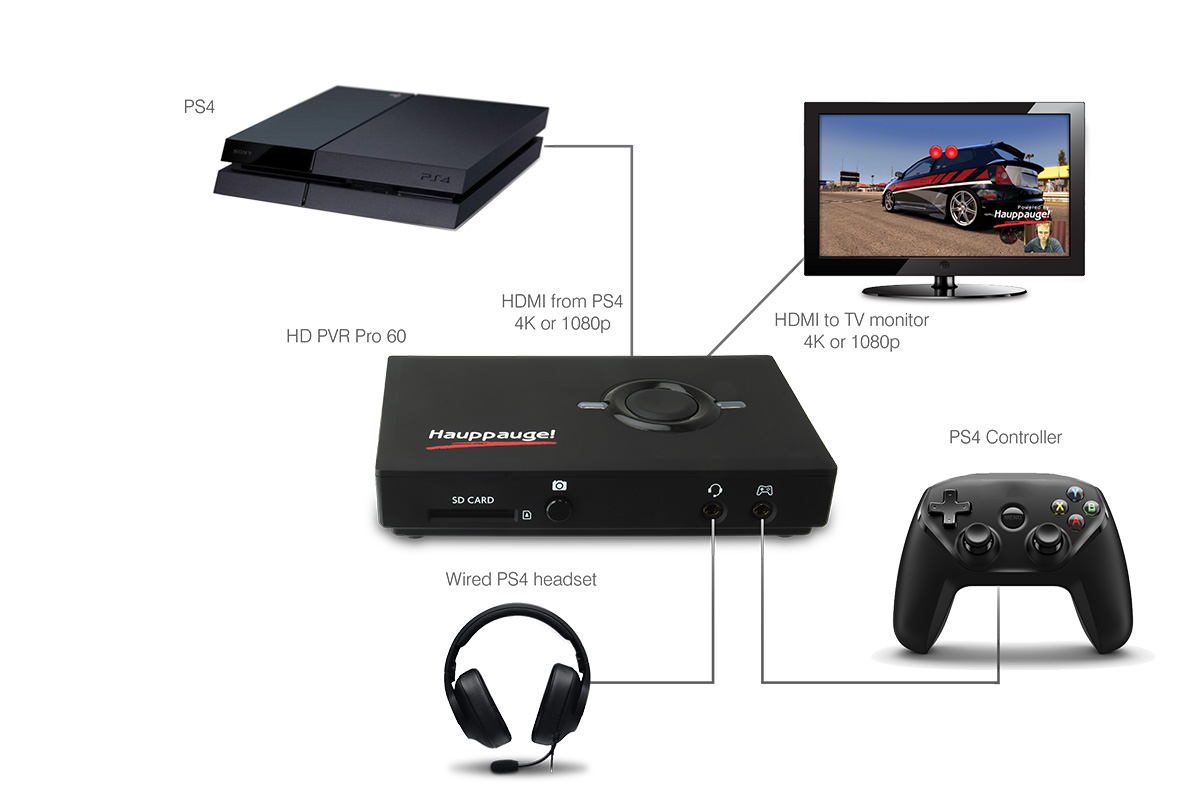 Record your PS4 video game play
Recording your PC Screen Connection Diagram
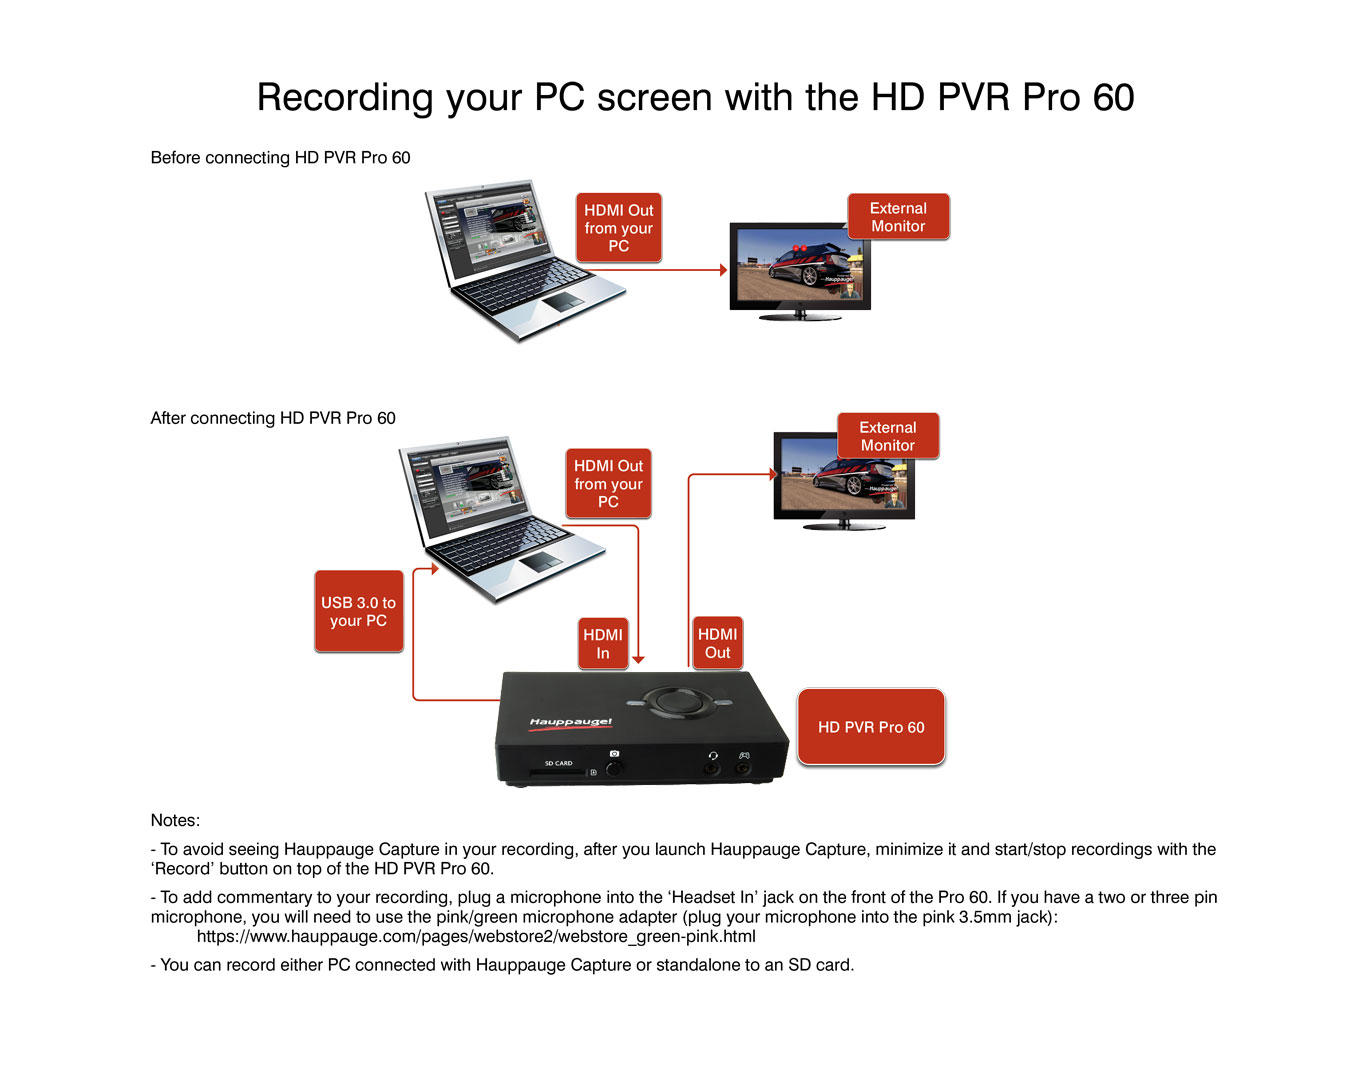 Record presentations and video calls from your PC screen
Standalone Recording
Notes:
- To record one long continuous file on the SD card (up to the capacity of the SD card), format the SD as ExFAT. Many SD cards come from the manufacturer programmed in the Fat32 format. If you leave the SD card as FAT32, long recordings will be broken into 4GBbyte recordings (about 1 hour each).
- To switch back to record on a PC, set the ‘Rec Mode’ switch to ‘PC’.
- If your SD card is write protected, you will not be able to record and the light will blink RED twice and then go solid GREEN.
How to set the HD PVR Pro 60 to record standalone
- Step 1: connect the HDMI Out from your cable box (or other HDMI video source which does not have HDCP copy protection) to the HDMI In on the Pro 60.
Then connect the HDMI Out on the Pro 60 to your TV set or TV monitor.
Make sure you can see your cable TV on your TV set. - Step 2: On the side of the HD PVR Pro 60, set the REC MODE switch to SD. The other position is 'PC' which sets the HD PVR Pro 60 to PC connected mode.
- Step 3: power on the HD PVR Pro 60 by plugging the USB Type C cable into a 5v .9a (or better) USB power supply. An iPad power supply is 5.1v at 2.1a and will work fine. The red light will blink red until the HDMI source is recognized and the SD card is plugged in.
- Step 4: Plug in an SD card to the Pro 60. The SD card can be formatted as Fat32 or exFAT (exFAT will allow you to make long recordings in one file). Wait until the light becomes solid green. This means the video source and SD card are recognized by the HD PVR Pro 60.
- Step 5: When you want to record, hit the Record button on top of the Pro 60 to start recording. The LED light on top will blink green. Hit the Record button to stop recording. It might take a second or so for the light to go solid green. At this point, you can either remove the SD card or make another recording.
Troubleshooting HD PVR Pro 60 standalone mode:
- Problem: No mic audio in standalone mode:
Solution: connect the HD PVR Pro 60 to a Windows PC. Run Hauppauge Capture. In the Capture tab, in the volume mixer, mute the Microphone. Then un mute the microphone. Adjust the microphone audio to the middle. Then close Hauppauge Capture. Re connect the HD PVR Pro 60 standalone and test with the microphone again. - Problem: Light is green but when I hit the Record button, the light stays green and no recording happens
Solution: On the 'REC MODE' switch, set to PC and then set to SD. Sometimes the slide switch does not fully go to the SD position. - Problem: Light is blinking red even though I have put an exFAT formatted SD card in
Solution: Remove the SD card, then replace it. Sometimes the SD card is not correctly positioned in its slot, and the HD PVR Pro 60 will not 'see' it.
Solution: If after removing and replacing the SD card, the light still blinks red, you might have to reformat your SD card. The blinking light means that either the SD card is either not completely positioned in its slot, or its not correctly formatted.
When using the HD PVR Pro 60, are you not getting game audio in your PS4 recordings?
Click to enlarge
The PS4 turns off HDMI audio when a headset is plugged into the controller. So, to get into your recordings, do this:
HDMI audio from the PS4 includes both game audio and multiplayer chat. When you plug in your headset into the PS4 controller, the PS4 shuts off HDMI audio and you will get game video but no game audio in your recordings.
To fix this problem:
Step 1: the HD PVR Pro 60 has a built-in audio mixer for the PS4 headset and controller. To get audio in your recordngs, on the front of the HD PVR Pro 60 plug your PS4 controller into the 'Controller in' port and your wired headset into the 'Headset in' port.
Step 2: set the 'Audio In' in Hauppauge Capture to 'Controller In' and you will get PS4 game and multi-player audio in your recordings with the HD PVR Pro 60.
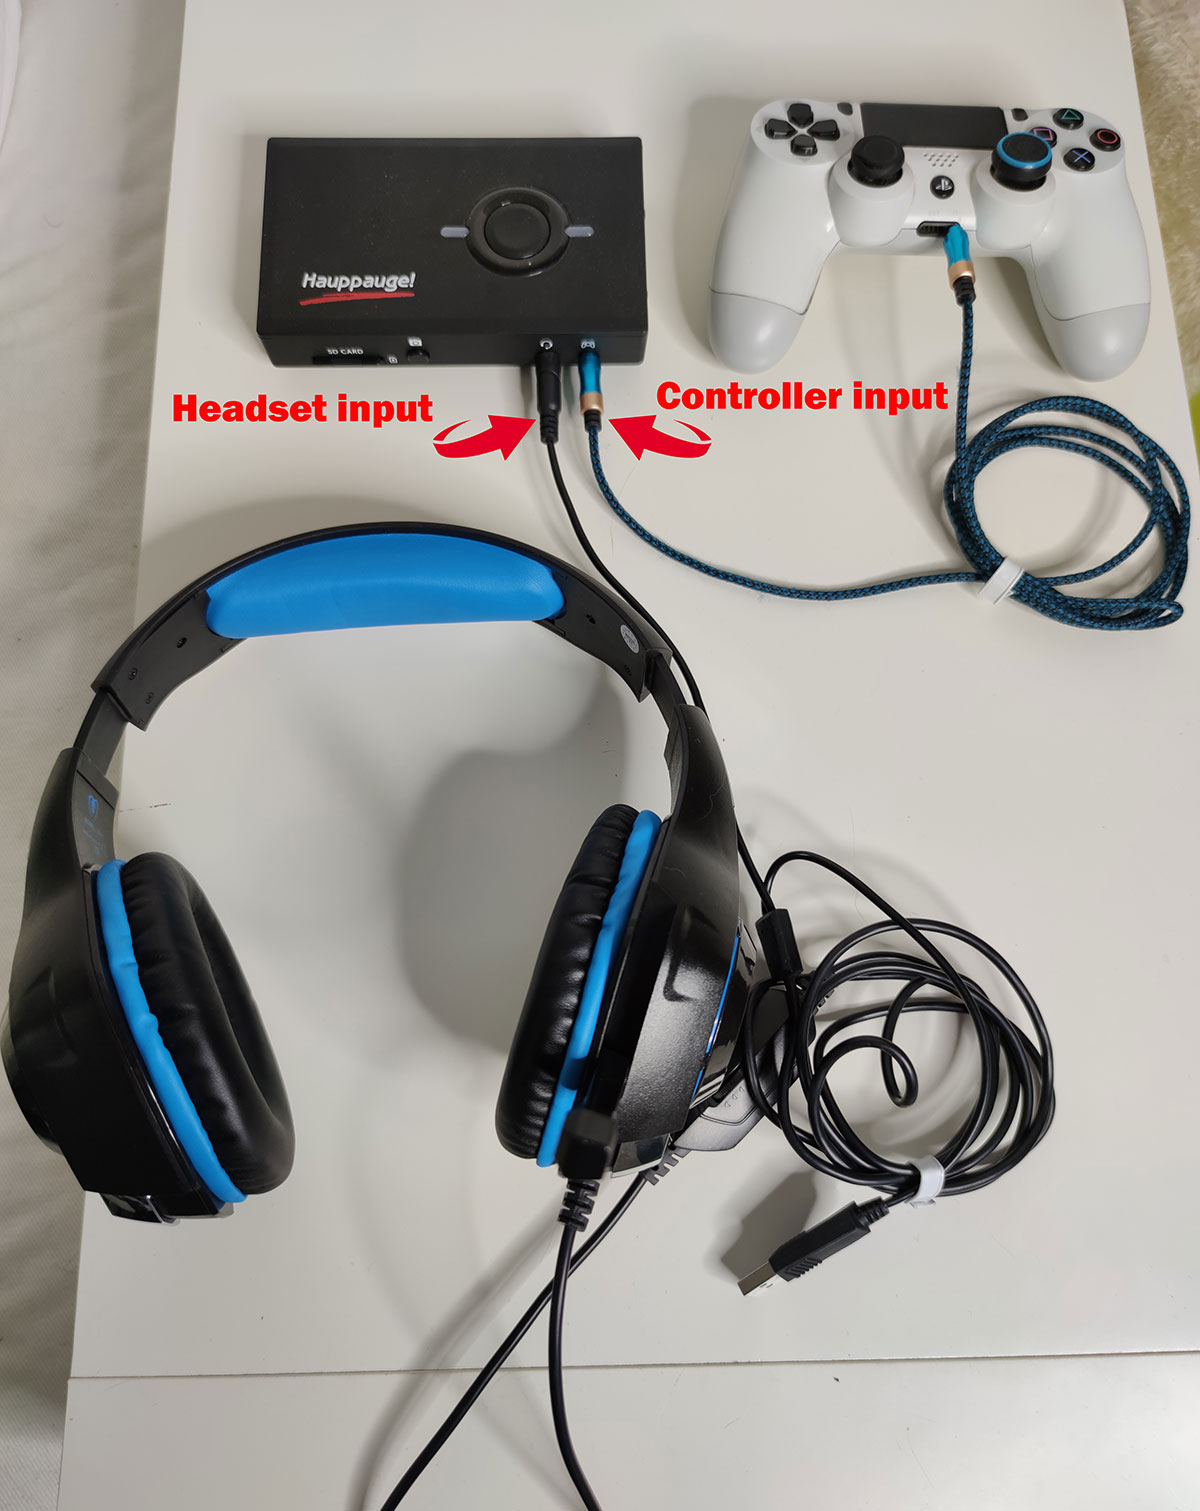
HD PVR Pro 60 cable setup for PS4
Click to enlarge

Hauppauge Capture Audio Setting for PS4
Click to enlarge
HD PVR Pro 60 Videos
Streaming with Twitch using OBS
& HD PVR Pro 60 from your 4k game console
Click to play video
How to record your PC screen with HD PVR Pro 60
Click to play video
Use Zoom with the HD PVR Pro 60
Click to play video
Adjust Xbox One game audio volume with HD PVR Pro 60
Click to play video
Using the PS4 with the HD PVR Pro 60
Click to play video
Using the HD PVR Pro 60 as a HD video source
for Skype
Click to play video
Using the HD PVR Pro 60 on a Mac
Click to play video
HD PVR Pro 60 Frequently Asked Questions
I want to plug my headset into the HD PVR Pro 60, but not connect a controller. What will I hear in my headset?
You will hear HDMI audio (audio from your video source).
When you have your headset plugged into the Headset port, HDMI audio is routed to three places: over the USB bus into your PC, out the HDMI Out port to your monitor and also to the headset. You will hear your game audio in your headset.
I'd like to use an external microphone instead of my video camera's built-in mic when streaming with the HD PVR Pro 60.
You can plug a microphone using the 4-pin headset in connector on the front of the HD PVR Pro 60. When you do this, the internal audio mixer inside the HD PVR Pro 60 will mix HDMI audio with your microphone audio and you can use the audio mixer in Hauppauge Capture to adjust the relative volume of the HDMI and microphone audio.
If you have a 4-pin headset with microphone, simply plug this into the headset in connector on front of the HD PVR Pro 60.
If you have a microphone with a two pin jack, you need to plug a 4-pin to 2-pin audio adapter ( the pink/green audio adapter ) into the headset in connector, and then plug your microphone into the pink connector.
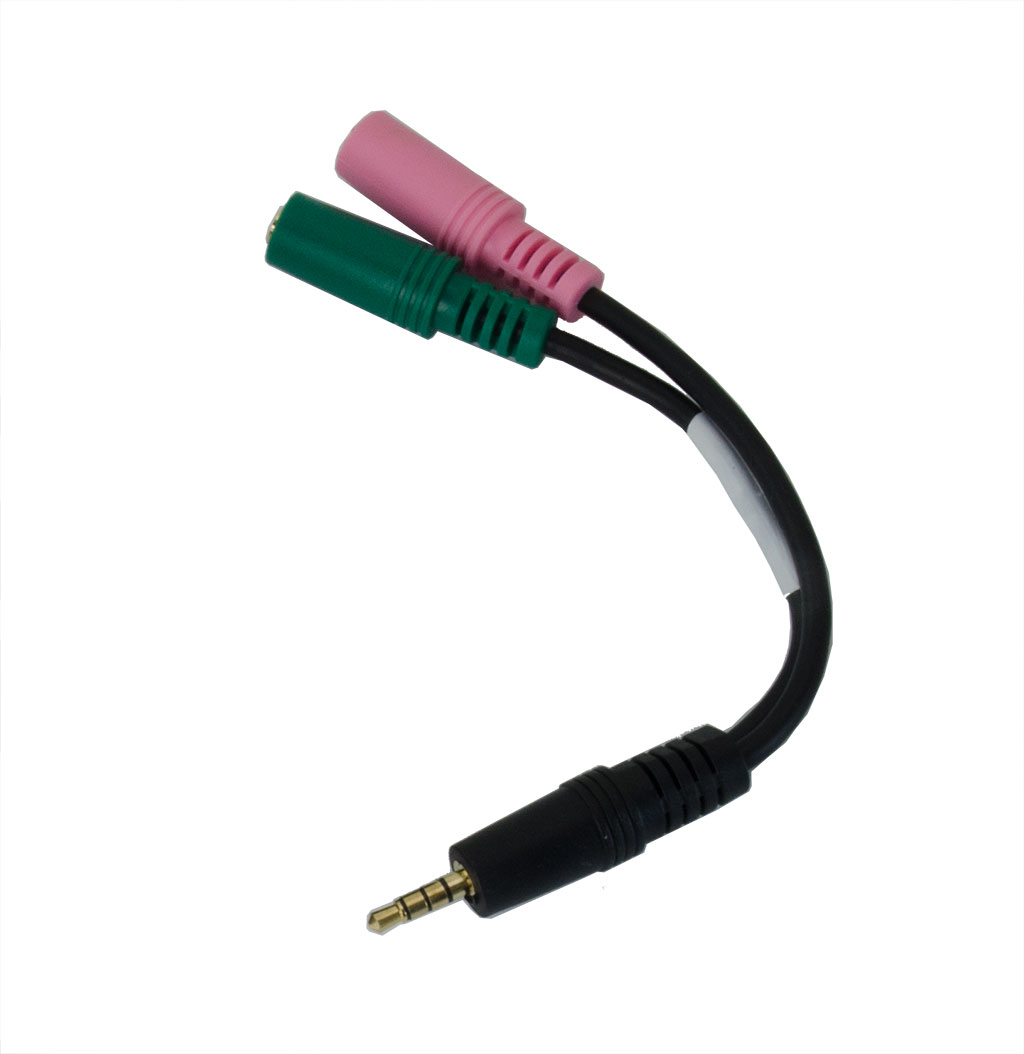
If you are conferencing with Zoom or Skype and want to turn off the HDMI audio (which normally comes from your camera's built-in microphone), do this:
- In Hauppauge Capture, turn the Game slider all the way to the left. This turns off audio coming from the HDMI In connector on the Pro 60.
- Set Mic: to HD PVR Pro 60 Microphone
- Plug your microphone into the 4-pin headset in port on the front of the HD PVR Pro 60 (or use the pink adapter as described above).
- Adjust the microphone volume using the Mic: slider in Hauppauge Capture. You should test the microphone audio to make sure the volume level is correct before you 'go live'.
What do the lights on the Pro 60 mean when it is in stand alone mode?
- White: the Pro 60 is booting up
- Blinking red: can't read SD card (or there is something wrong with the SD card format)
- Solid red: no video or video out of range
- Solid GREEN: ready to start recording
- Blinking GREEN: recording
- Two red blinks, then GREEN: your SD card is write protected and recording cannot start
- Solid GREEN after the record button is hit: the Rec Mode switch is in the wrong position (set to PC instead of SD)
When I plug my game controller into the Controller In port on the HD PVR Pro 60, what happens to the audio?
As soon as you plug anything into the Controller In port, HDMI In audio is disabled (HDMI passthrough is continued to be passed through) and audio to both your headset and to the USB bus now comes from the Contoller In port.
I am using an Xbox One X. When I connect my controller to the Controller In port on the HD PVR Pro 60, the game audio volume is too low. How can I fix this?
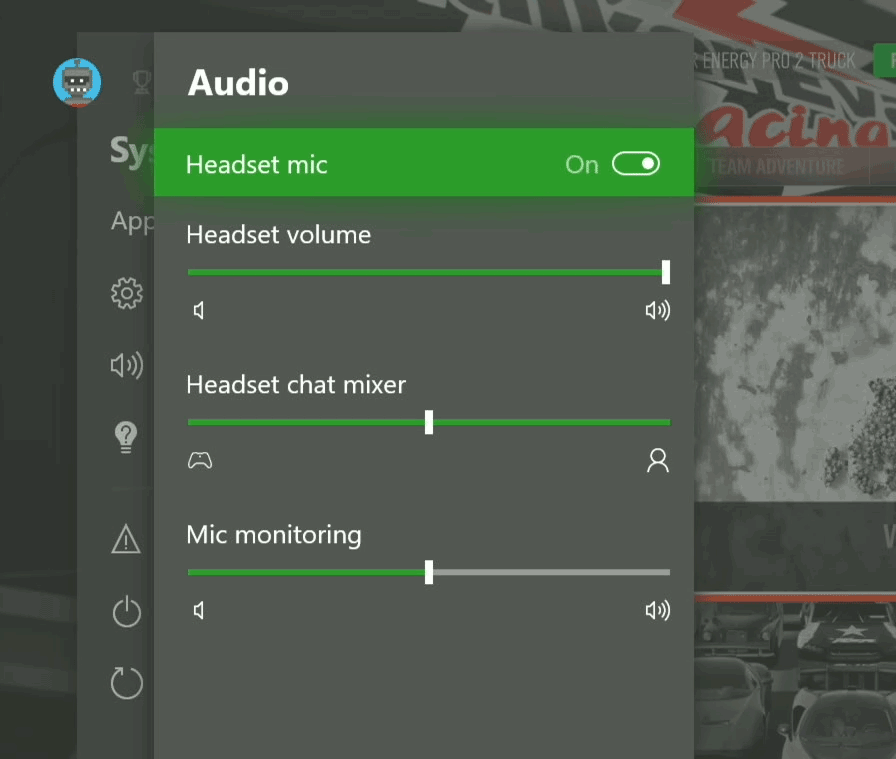
Xbox One game audio volume too low? Here's how to fix it!
Click to enlarge
On your Xbox One X with your headset connected to your Xbox controller, hit the Xbox button to go to Home.
Then go down to Settings.
Use the Left stick on your controller to go right.
Go down to Audio.
Use the A button to select Audio.
Go to Headset Volume. Increase to 100% (or less as you like). Then use the B button to go back to the main menu.
If, after making this adjustment on your Xbox One X, the headset volume is too high, you can adjust it down in Hauppauge Capture by using the Headset slider on the left side of Hauppauge Capture.
I am getting low game audio volume in my Xbox One X recordings, but my microphone audio is good. How can I fix this?
The Xbox One and Xbox One X controllers can be configured to lower the game audio volume in the Xbox One Chat mixer. We find that sometimes this knocks down the game volume too much. To fix this, on your Xbox One go to:
Settings -> Display and Sound -> Volume -> Chat Mixer
and set this to Do nothing
I'm trying to record from a Nintendo Switch, but I'm getting a 'No HDMI signal detected' message. How can I fix this?
The basic problem is that the Switches HDMI resolution is not what the HD PVR needs to sync up.
Do this:
- In the Switch settings System settings > TV output > TV resolution, change from 'Automatic' to either 720p or 1080p
- you must connect the power to the docking station before connecting the HDMI lead to the HD PVR 2
What's the maximum bit rate of my PC based recordings?
How can I record multi-player game chat with my console?
With the Xbox One and Xbox One X, game chat is only available from the Xbox One controller. To record game chat plus game audio, use the supplied 4-pin to 4-pin cable to connect from your Xbox One controller to the Controller In jack on the front of the HD PVR Pro 60. This brings game audio plus chat into the HD PVR Pro 60. Note: as soon as you plug in the 4-pin cable into the Controller In jack on the Pro 60, the HDMI audio is muted for recording (but not passthrough).
In Hauppauge Capture, you can adjust the audio volume in Hauppauge Capture with the Game slider.
How can I record record my game commentary with the HD PVR Pro 60?
The HD PVR Pro 60 is an audio mixer inside which will take the microphone from your headset, and both add it to the recording and at the same time, send it out to the Controller In jack.
To do this, simply connect your headset to the Headset In on the HD PVR Pro 60. If you want your commentary to be sent as part of multi-player chat, connect your game controller to the Controller In jack on the front of the Pro 60.
In Hauppauge Capture, you can adjust the audio volume in Hauppauge Capture with the Voice slider. You can adjust the volume of the game auio in your headset with the Headset slider.
How do I turn off HDCP on a PS4?
- On the PS4, go to Settings: from the main user interface, push up on the DualShock 4 to reach the top-level of the system’s menu, and select the toolbox labelled ‘Settings’
- Enter the System submenu: When the long list of options appears, scroll down to the icon named ‘System’ and select it
- Turn off HDCP encryption: You’ll find another long list in Settings. Scroll down to ‘Enable HDCP’ and ensure that the box to the right of the label is not ticked. It will be enabled by default, so simply click on it to disable the irritating feature. If you have any applications open, the system will ask you to close them, so make sure that you’ve saved your game before completing this last step.
How do I turn off HDCP on an Xbox One?
The following information comes from the Xbox support site
Problem: Playing premium content on your console establishes an HDCP connection with your television. Some unintended video and sound behavior may occur if you plug in a DVR or home entertainment system while the console is turned on.
To resolve this problem, try the following solutions:
- Restart your Xbox One console:
- Press the Xbox button on the console for ten seconds until the console turns off.
- Touch the Xbox button on the console again to turn it on.
- Try to play the content again.
- If your Xbox One console is in instant-on power mode:
- Go to the Home screen.
- Press the Menu button on your controller and select Settings.
- Go to Power & startup, then Power options.
- Select Power mode and then select Save Energy.
- Turn off the console by holding the Xbox button.
- Turn on the console by pressing the Xbox button, and then try to play the content again.
What types of video sources can I record?
The HD PVR Pro 60 can record 4K (down converted to 1080p60) or 1080p60 HDMI video sources without HDCP. Common examples: PS4 Pro (4K), Xbox One X (4K), Xbox One (1080p60), PS4 (1080p60), WiiU (1080p60), Xbox 360 (1080p60), PC Graphics card (normally 1080p60).
Using HDMI video, what is the highest Resolution/Frame Rate I can Capture with the HD PVR Pro 60?
The HD PVR Pro 60 can record up to 1080p at 60 frames per second. For 4K video sources, a built-in downscaler converts 4K to 1080p60.
Does the HD PVR Pro 60 have lag-free pass through?
Yes, the HD PVR Pro 60 has a no delay pass-thru for 4K and 1080p video sources, so you can see your game on your TV set and at the same time, record your game play.
What is the button on the top of this device used for?
The button is used to start and stop recordings.
Does the HD PVR Pro 60 come with a power supply?
No, the HD PVR Pro 60 is powered by the USB 3.0 port on your PC. If you are trying to record standalone, you can use a standard USB power adapter as long as it is rated at 5v at 1 amp.
Can I use the HD PVR Pro 60 to Stream?
The HD PVR Pro 60 is compatible with both OBS and XSplit for streaming.
Hauppauge is currently working on a version of StreamEez to run with the HD PVR Pro 60.