
Soporte : HD PVR 60
Hauppauge Capture
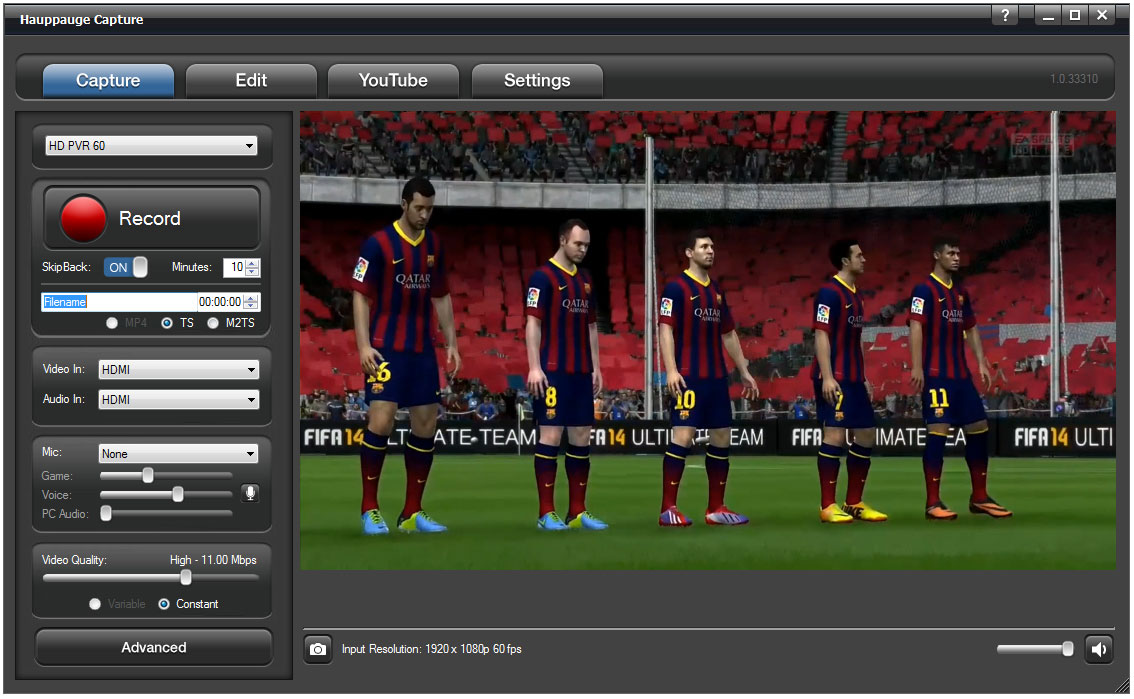
Hauppauge Capture for the HD PVR 60
Record, trim and upload your game play
Hauppauge Capture features:
- Record and stream your game play with in-game chat with our microphone mixing feature
- Simple and fast trim editor
- Built-in YouTube upload
- StreamEez for easy streaming
- Simple to use video quality selector and scaling options
Hauppauge Capture
![]() Version 35054 | Date: Feb. 24, 2017
Version 35054 | Date: Feb. 24, 2017
To install:
- Click the download button and save Hauppauge Capture to your PC (do not select 'Run')
- Once Hauppauge Capture is downloaded, run the Hauppauge Capture installation
- After installation, you will be asked to reboot your PC. Please reboot.
- While rebooting your PC, if you have an HD PVR 2, remove the power plug from the back of the HD PVR 2 for a few seconds and then plug it back in. This resets the HD PVR 2.
- Once your PC is rebooted, you will see the Hauppauge Capture icon on your Windows desktop. Run it. No other setup is needed.
New features in the version

- Adds StreamEez for the HD PVR 60 - stream with Twitch and YouTube
- Videos are now stored in This PC -> Videos -> HauppaugeVideos
- Skipback can now go to 0
- Added Facecam support for Logitech webcams
- Low resource mode can be turned off if you have an i7 CPU and are using Facecam
- Skipback function in the Capture tab so you can record up to 16 hours in the past.
- Adds Facecam to recordings: To turn on the Facecam, go to the Settings tab and select your webcam in the Webcam drop down menu. On slower PCs (slower than an Intel i5), the 'Low resource mode' is turned on.
- Includes FaceCam frame. The setup for frames is in the Settings tab. You can make your own frame too! Just create a png file with a megenta background where you want FaceCam to go, and drop the PNG file in Users -> Public -> Hauppauge Capture -> Effects. It will then show up in the list of frames in the Settings menu.
Comments, questions on this version? Please e-mail us at: support@hauppauge.com
Upgrade your HD PVR 60 with the latest features
Firmware version 34327
Firmware version 34327 | Date: June 23, 2016
Note: this firmware is included as part of all Hauppauge Capture installations
Release notes:
- Contains 4:2:2 video fix
Installation instructions:
Note: the firmware update takes about 10 minutes. After you start it, go get yourself a cup of coffee. When the firmware upgrade is complete, a message will appear on your screen.
- Click the Download button above (this is the latest HD PVR 60 firmware). Save to your PC (do not click Run).
- Make sure your HD PVR 60 is plugged into a USB port on your PC.
- Run the downloaded file.
- Click Install and the firmware upgrade will begin. Your HD PVR 60 will blink for a few seconds and then the firmware update will be complete
- Click Finish
Windows Driver for HD PVR 60
HD PVR 60 Windows driver version 34049
Note: this driver is included as part of all Hauppauge Capture installations
This version has an update to fix a Code 52 installation problem on some versions of Windows.
To install this driver update:
- Download this file.
- Click the file to install.
- When the Windows driver has been installed, you will see a message Drivers installation status: Success
- When finished running the update, you will be ask to restart your PC. Restart your PC
- While the PC is restarting, remove the USB cable for a few seconds, and plug it back in. This will power cycle your HD PVR 60 to load the new firmware.
Windows Driver for HD PVR 60
HD PVR 60 Windows driver version 34035
![]() HD PVR 60 Windows driver version 34035
HD PVR 60 Windows driver version 34035
This version has an update to fix a Code 52 installation problem on some versions of Windows.
To install this driver update:
- Download this file.
- Click the file to install.
- When the Windows driver has been installed, you will see a message Drivers installation status: Success
- When finished running the update, you will be ask to restart your PC. Restart your PC
- While the PC is restarting, remove the USB cable for a few seconds, and plug it back in. This will power cycle your HD PVR 60 to load the new firmware.
File name: hdpvr60_driver_34035.exe
Date: Feb. 9, 2016
File size: 1.8MB
Using HD PVR 60 to record your PC game play or your PC screen
Step 1 - Connect the HD PVR 60 to your PC and install Hauppauge Capture
Step 2 - Configure your Gaming PC's video mode
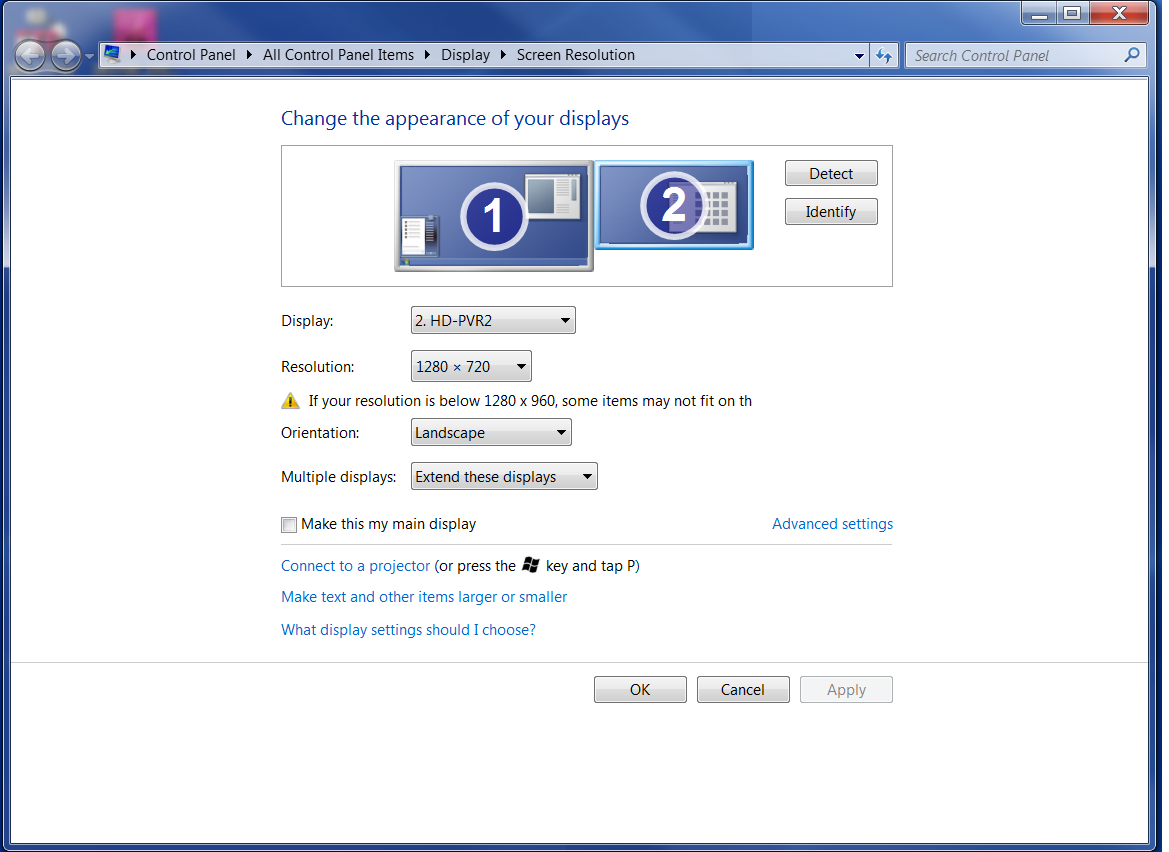
Screen resolution menu
on your Windows PC
(click to enlarge)
The Resolution must be set to either 1920X1080 or 1280X720
Note: HD PVR 2 can accept video from a PC in the following formats ONLY:
- 1920 x 1080 at 60Hz max
- 1280 x 720 at 60 Hz max
- 720 x 480 at 60 Hz max
If you are running in any other video mode, you will see either a black screen or distorted video. Check your video mode!
On the computer where you will be playing your video games (we'll call this the Gaming PC), connect an HDMI cable from your graphics card HDMI port to the HDMI in on the HD PVR 2.
Note: your Gaming PC screen may go black for several seconds and then you will be back at the Windows desktop.
On your Gaming PC, right click on your Windows desktop and select Screen resolution (click for screen shot).
Under Display you should see HD PVR2 in the drop down menu.
Select HD-PVR 2 (click for screen shot).
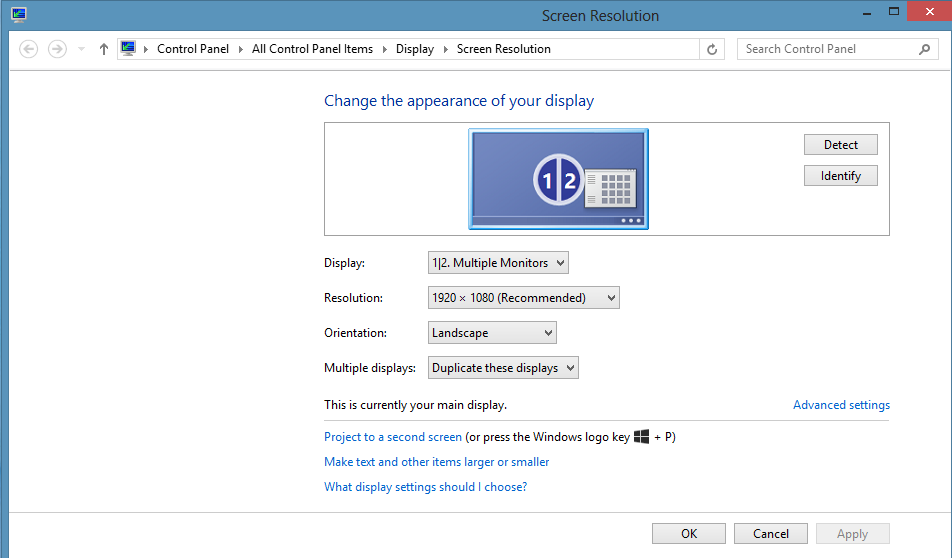
Under Resolution, set to either 1920X1080 or 1280X720.
Under Multiple displays, set to Duplicate these displays.
Click Advanced settings (click for screen shot). Set Refresh Rate to 60p Hz Set Scaling to Maintain Display Scaling.
Step 3 - Connect the HDMI cable from your Gaming PC to the HD PVR 2 HDMI In connector
If you have a gaming laptop, simply plug an HDMI cable from your laptops' HDMI out port into the HDMI In on the HD PVR 2. You should see your PC screen on the video monitor. If you do not, click the Windows button on your keyboard and at the same time the P key. Then select Duplicate. If you have set your PC's video mode correctly (step 2 above), you should see your PC screen on the video monitor.
If you have a desktop PC, then remove the HDMI cable which is plugged into the monitor and plug it into the HDMI In port on the HD PVR 2. Then take an HDMI cable and plug one end into the HDMI Out port on the HD PVR 2 and the other end into an HDMI port on your monitor. If you have set your PC's video mode correctly (step 2 above), and you have selected the correct HDMI source on your TV set, you should see your PC screen on the video monitor.
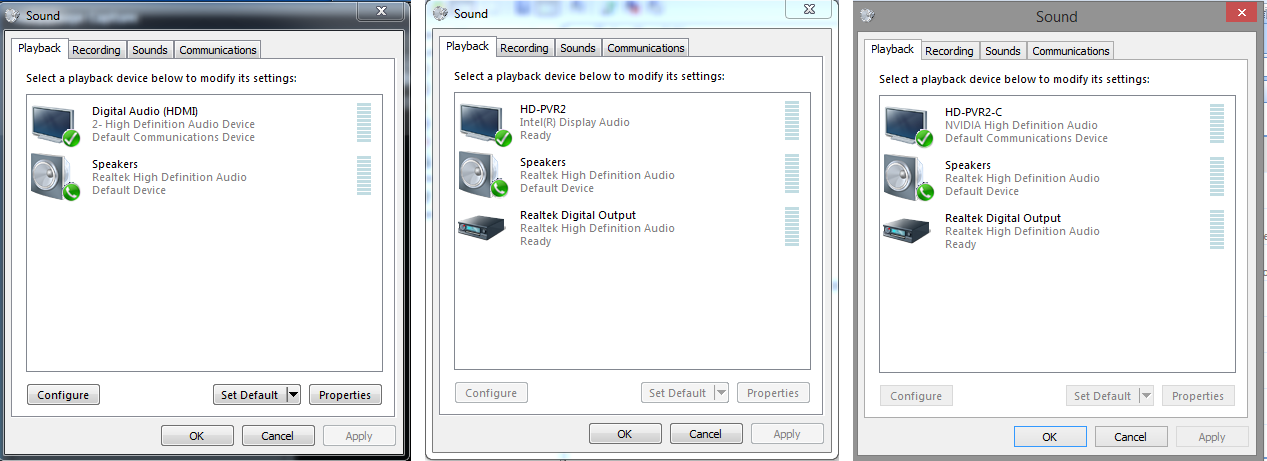
Step 4 - Configure the audio on your Gaming PC if sound comes through your HDMI cable
If you are using the HDMI pass through on the HD PVR 2 (if you are not using HDMI pass-through skip to step 4a), on your Gaming PC right click on the Speaker icon on the taskbar and select Playback device.
In Playback devices find your HDMI connection to the HD PVR 2 (it should say HD-PVR2 or Digital audio (HDMI)). Right click and select Set as default device.
Step 4a - Configuring audio if you are using speakers connected directly to your Gaming PC
If you are listening to sound from your Gaming PC through speakers and not on your video monitor, to hear audio without any audio delay you will need to split the audio coming from your Gaming PC. To do this, you will need two adapters: an 1/8th inch stereo Y adapter, a 1/8th inch stereo to RCA male adapter.and an Audio cable set. These adapters are common and can be purchased from Radio Shack or online.

- Connect the 1/8" stereo 'Y' adapter to the green audio port (the audio out port) on your Gaming PC.
- Plug your speaker cable into one end of the 1/8" stereo 'Y' adapter.
- On the other end of the 1/8" stereo 'Y' adapter connect the 1/8th inch stereo to RCA male adapter
- Plug in the Audio cable set into the RCA plugs on the 1/8" stereo to male adapter (click to see a picture of the audio splitter installed)
- Then plug the other end of the Audio cable set into the HD PVR 2 via the Hauppauge AV adapter cable (the black audio jacks).
- Plug the Hauppauge AV adapter into the AV input on the back of the HD PVR 2.(click here to see the complete cable setup)
- In Hauppauge Capture, in the Capture or StreamEez tab, set Audio in to Line in and mute the audio (so you will not hear an audio echo).
Here are some screen shots if you have an nVidea 650M graphics adapter in your gaming PC
Screen resolution menu |
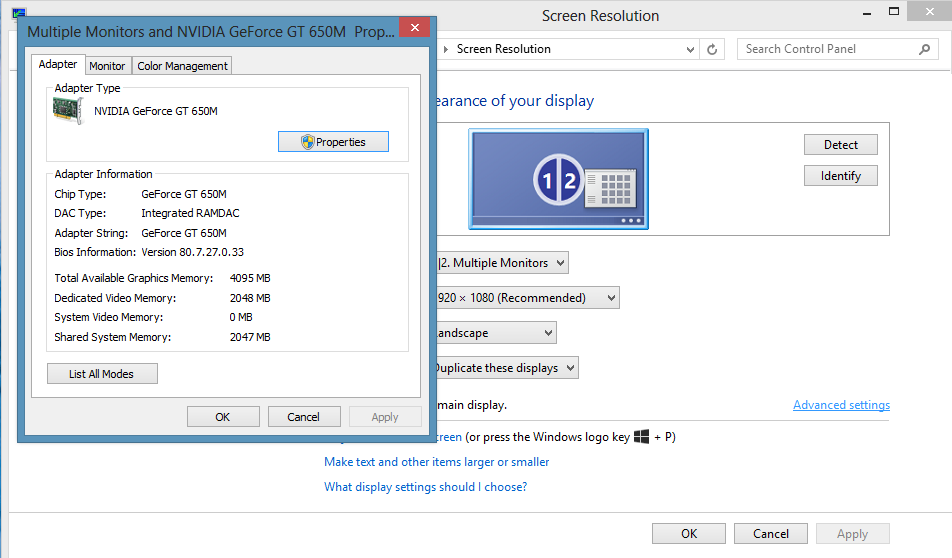 Advanced Settings menu. Then click List All Modes |
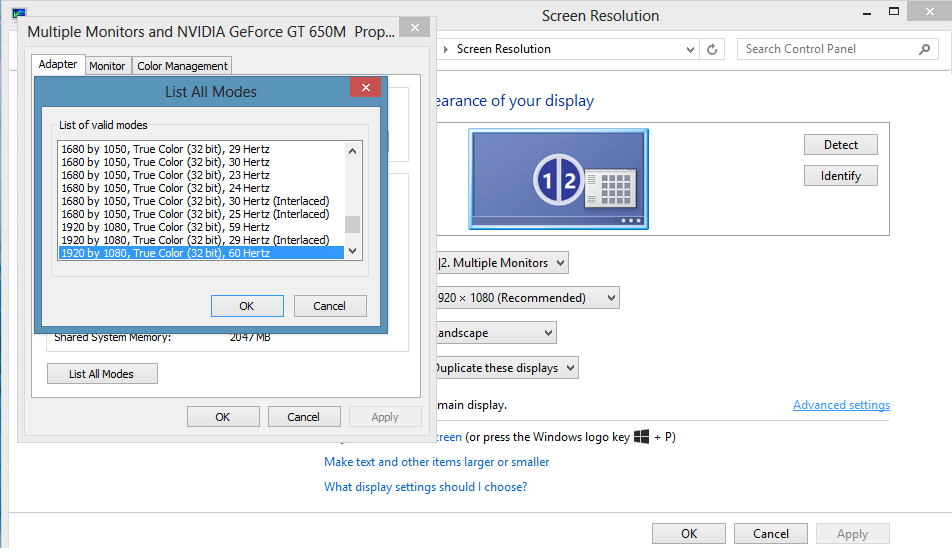 List All Modes menu. Set the screen resolution to 1920 by 1080, True Color (32-bit), 60Hz. Then click OK / OK and Apply. |
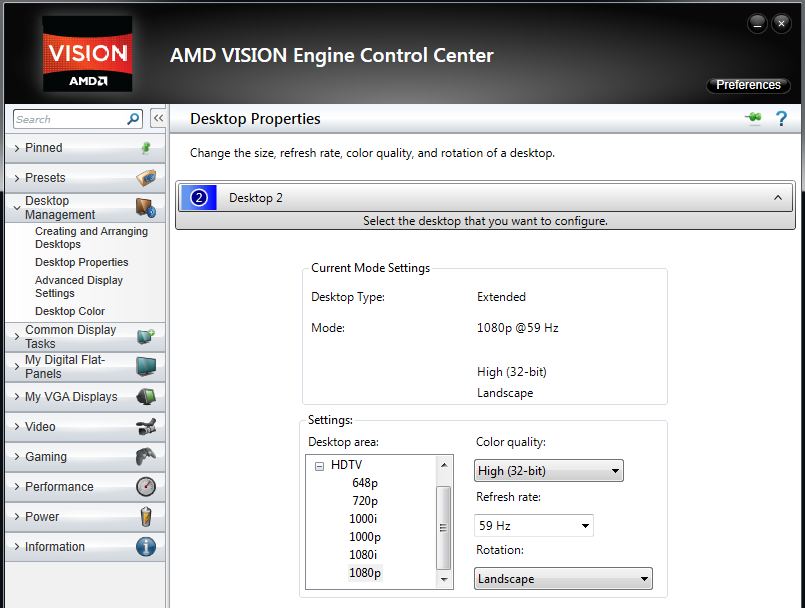
Here are some screen shots if you have an ATI graphics adapter in your gaming PC
In the AMD Vision Control Center, under Desktop Management/Desktop Properties, set the Desktop area to 1080p or 720p and the Refesh rate to 60Hz, 59Hz or 50Hz
Frequently asked questions
Troubleshooting the HD PVR 60
Are you unable to record video, getting no video (but are getting audio) in your recordings or a black screen in Hauppauge Capture?
The HD PVR 60 cannot record HDMI video which has HDCP copy protection. This can be from an Xbox One or a PS4, or a cable TV or satellite box.
If you have a cable TV or satellite box, you must use Component video and not HDMI. If you have a PS4 or an Xbox One, you need to disable HDCP. Here is how to do this:
- Xbox One: Press the Xbox button on the console for ten seconds until the console turns off. Touch the Xbox button on the console again to turn it on. Try to play the video game again.
- On the PS4: Go to Settings: from the main user interface, push up on the DualShock 4 to reach the top-level of the system’s menu, and select the toolbox labelled ‘Settings’. Enter the System submenu: When the long list of options appears, scroll down to the icon named ‘System’ and select it. Turn off HDCP encryption: You’ll find another long list in Settings. Scroll down to ‘Enable HDCP’ and ensure that the box to the right of the label is not ticked. It will be enabled by default, so simply click on it to disable the irritating feature. If you have any applications open, the system will ask you to close them, so make sure that you’ve saved your game before completing this last step.